一、由 iter 包引发的疑问 最近在 GitHub 上偶然发现了 Brad Fitzpatrick 的 iter 包,整个包只有 一个函数 (一行代码):
1
2
3
func N (n int ) struct {} { return make ([]struct {}, n) }
但其中的一行注释令人费解:
It does not cause any allocations.
1. 空结构体 我们知道,struct{} 是空结构体(empty struct)。关于空结构体,Dave Cheney 在 The empty struct 中作了很好地阐述:
空结构体不占用空间(The empty struct consumes no storage)。
空结构体的切片只占用切片头的空间(Slices of struct{}s consume only the space for their slice header)。
2. Go 切片 按照官方博客 Go Slices: usage and internals 的说法:
A slice is a descriptor of an array segment. It consists of a pointer to the array, the length of the segment, and its capacity (the maximum length of the segment).
因为切片总是指向一个底层数组的,所以所谓的 “切片头” 其实就是切片本身。一个切片包括:指向数组片段的指针、数组片段的长度和最大长度,总共 3 个字长(在 64 位机器上,就是 24 个字节)。
3. 疑问 按照上面的分析,在 64 位机器上,不管 n 是多少,make([]struct{}, n) 得到的切片一定会占用 24 个字节,reddit 上的讨论 也证实了我们的分析。
那为什么 Brad Fitzpatrick 声称函数 N 不会引发分配呢?
为了解决这个疑惑,我们需要先弄清楚两个问题:
一个 Go 变量可能会被分配在哪里?
如何确定一个 Go 变量最终会被分配在哪里?
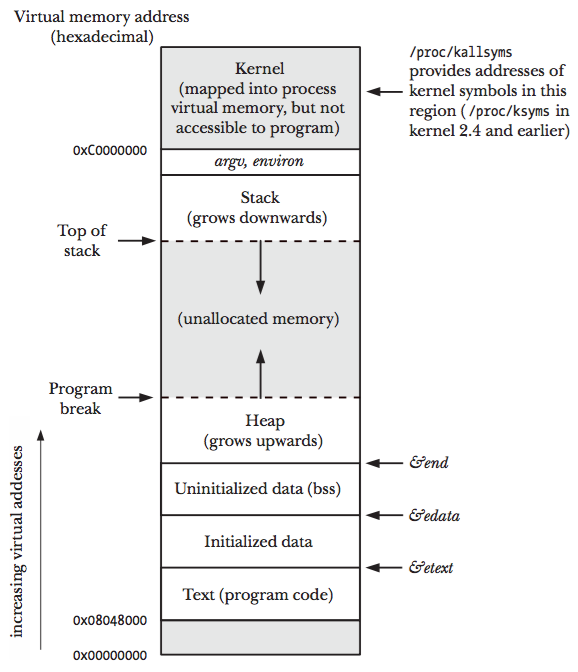
二、Go 变量可能的分配位置 1. 进程的内存布局 在 Linux/x86-32 系统中,一个进程的典型的内存布局如下图所示(图片来自 The Linux Programming Interface 图 6-1):
结合维基百科对 Data segment 的描述,我们得知:
初始化的全局变量或静态变量,会被分配在 Data 段。
未初始化的全局变量或静态变量,会被分配在 BSS 段。
在函数中定义的局部变量,会被分配在堆(Heap 段)或栈(Stack 段)。
2. Go 内存分配 对于 Go 而言,有两个地方可以用于分配:
堆(heap)
栈(stack)
不涉及 GC 操作。
每个 goroutine 都有自己的栈,初始时被分配在进程地址空间的栈上,扩容时被分配在进程地址空间的堆上。
Go 变量主要分为两种:
全局变量
会被 Go 编译器标记为一些特殊的 符号类型 ,分配在堆上还是栈上目前尚不清楚,不过不是本文讨论的重点。
局部变量
所以综上,对于在函数中定义的 Go 局部变量:要么被分配在堆上,要么被分配在栈上 。
三、确定 Go 变量最终的分配位置 至此,我们还剩下一个问题:对于一个 Go 局部变量,如何确定它被分配在堆上还是栈上?
按照官方 FAQ How do I know whether a variable is allocated on the heap or the stack? 的解释:
Go 编译器会尽可能将变量分配在栈上
以下两种情况,Go 编译器会将变量分配在堆上
如果一个变量被取地址(has its address taken),并且被逃逸分析(escape analysis )识别为 “逃逸到堆”(escapes to heap)
如果一个变量很大(very large)
1. 逃逸分析 以使用 iter 包的这段代码为例:
1
2
3
4
5
6
7
package mainimport "github.com/bradfitz/iter" func main () for range iter.N(4 ) {} }
下列演示中,我将使用 Go 1.11.4:
1
2
$ go version go version go1.11.4 darwin/amd64
下面我们对这段代码作逃逸分析:
1
2
3
4
5
6
$ go build -gcflags='-m -m' examples/go_mem/main.go examples/go_mem/main.go:5:6: cannot inline main: unhandled op RANGE examples/go_mem/main.go:6:18: inlining call to iter.N func(int) []struct {} { return make([]struct {}, iter.n) } examples/go_mem/main.go:6:18: make([]struct {}, iter.n) escapes to heap examples/go_mem/main.go:6:18: from make([]struct {}, iter.n) (non-constant size) at ./main.go:6:18
按照前面的分析,从 “make([]struct {}, iter.n) escapes to heap” 的信息,我们推断:make([]struct {}, iter.n) 会被分配在堆上。
到这里,我们最初的疑惑似乎已经有了答案:make([]struct {}, iter.n) 一定会引发堆分配,那是 Brad Fitzpatrick 的注释写错了吗?
2. 内存分配器追踪 除了逃逸分析,Go 还提供了一种叫内存分配器追踪(Memory Allocator Trace )的方法,用于细粒度地分析由程序引发的所有堆分配(和释放)操作:
1 $ GODEBUG=allocfreetrace=1 go run examples/go_mem/main.go 2>&1 | grep -C 10 examples/go_mem
因为进行内存分配器追踪时,很多由 runtime 引发的分配信息也会被打印出来,所以我们用 grep 进行过滤,只显示由用户代码(user code)引发的分配信息。然而这里的输出结果为空,表明 make([]struct {}, iter.n) 没有引发任何堆分配。
内存分配器追踪的结论与逃逸分析的结论截然相反!那到底哪个结论是对的呢?
3. 汇编分析 黔驴技穷之际,Go’s Memory Allocator - Overview 这篇文章给了我提示:
So, we know that i is going to be allocated on the heap. But how does the runtime set that up? With the compiler’s help! We can get an idea from reading the generated assembly.
关于 Go 汇编(assembly),推荐大家阅读 Go internals, Chapter 1: Go assembly 。
下面我们来看看示例代码对应的汇编:
1
2
3
4
5
6
7
8
9
$ go tool compile -I $GOPATH /pkg/darwin_amd64 -S examples/go_mem/main.go ... 0x001d 00029 (examples/go_mem/main.go:6) LEAQ type.struct {}(SB), AX 0x0024 00036 (examples/go_mem/main.go:6) PCDATA $2 , $0 0x0024 00036 (examples/go_mem/main.go:6) MOVQ AX, (SP) 0x0028 00040 (examples/go_mem/main.go:6) MOVQ $4 , 8(SP) 0x0031 00049 (examples/go_mem/main.go:6) MOVQ $4 , 16(SP) 0x003a 00058 (examples/go_mem/main.go:6) CALL runtime.makeslice(SB) ...
可以看到,其中有一处对 runtime.makeslice(SB) 的调用,显然是由 make([]struct{}, n) 引发的。
查看 runtime.makeslice 的源码:
1
2
3
4
5
func makeslice (et *_type, len , cap int ) ... p := mallocgc(et.size*uintptr (cap ), et, true ) return slice{p, len , cap } }
其中,mallocgc 的源码如下:
1
2
3
4
5
6
7
8
9
10
11
func mallocgc (size uintptr , typ *_type, needzero bool ) ... if size == 0 { return unsafe.Pointer(&zerobase) } ... if debug.allocfreetrace != 0 { tracealloc(x, size, typ) } ... }
slice 对应的结构体如下:
1
2
3
4
5
type slice struct { array unsafe.Pointer len int cap int }
结合上述几段源码,我们可以看出:
makeslice 函数中:slice 结构体正是我们在第一节提到的 Go 切片 —— array 是指向数组片段的指针,len 是数组片段的长度,cap 是数组片段的最大长度。
makeslice 函数中:array 的值来自 p,而 p 则是一个指针,它指向由 mallocgc 分配得到的底层数组。
mallocgc 函数中:因为空结构体的 size 为 0,所以 mallocgc 并没有实际进行堆分配 ;由于没有执行到 tracealloc 的地方,所以进行内存分配器追踪时,不会采集到相关的分配信息。
makeslice 函数中:切片 slice 本身是以结构体的形式返回的,所以只会被分配在栈上。
四、总结 经过一系列的探索和分析,至此,我们可以得出以下结论:
make([]struct{}, n) 只会被分配在栈上,而不会被分配在堆上。Brad Fitzpatrick 的注释是对的,并且他的意思是 “不会引发堆分配”。
逃逸分析识别出 escapes to heap,并不一定就是堆分配,也可能是栈分配。
进行内存分配器追踪时,如果采集不到堆分配信息,那一定只有栈分配。
最后,我们来解答文章标题提出的疑问 —— 如何确定一个 Go 变量会被分配在哪里?对此,我们的答案是:
先对代码作逃逸分析 。
如果该变量被识别为 escapes to heap,那么它十有八九是被分配在堆上。
如果该变量被识别为 does not escape,或者没有与之相关的分析结果,那么它一定是被分配在栈上。
如果对 escapes to heap 心存疑惑,就对代码作内存分配器追踪 。
如果有采集到与该变量相关的分配信息,那么它一定是被分配在堆上。
否则,该变量一定是被分配在栈上。
此外,如果想知道 Go 编译器是如何将变量分配在堆上或者栈上的,可以去分析 Go 汇编(以及 runtime 源码) 。
五、思考题
六、相关阅读